
Как на Windows 11, так и на 10 инструмент, называемый MSConfig или Configuration, является встроенной функцией, которая помогает вам в диагностике проблем и управлении последовательности запуска вашей операционной системы.
Пока крипто-инвесторы ловят иксы и ликвидации, мы тут скучно изучаем отчетность и ждем дивиденды. Если тебе близка эта скука, добро пожаловать.
Купить акции "голубых фишек"Этот инструмент позволяет включить/выключить различные программы, функции устройства и системные службы, которые инициируются во время запуска системы. Он также позволяет настраивать настройки загрузки, такие как обеспечение доступа к безопасному режиму. Эта утилита оказывается довольно удобной при устранении проблем с производительностью и разрешением несоответствий программного обеспечения в операционной системе.
Конфигурация системы, как вы знаете, не является недавним дополнением. Это было частью семейства Windows со времен Windows 98. Со временем он претерпел изменения, но базовый пользовательский опыт не видел значительного преобразования. При этом были представлены некоторые новые функции, а другие сняты, например, функциональность для управления приложениями запуска.
В этом пошаговом учебном пособии я проведу вас процессом использования инструмента конфигурации системы в Windows 11. Примечательно, что те же шаги можно использовать и для Windows 10.
Как получить доступ к msconfig в Windows 11
Чтобы открыть утилиту конфигурации системы, у вас есть как минимум два варианта:
Из диалогового окна «Выполнить»:
Чтобы открыть MSConfig из запуска, используйте эти шаги:
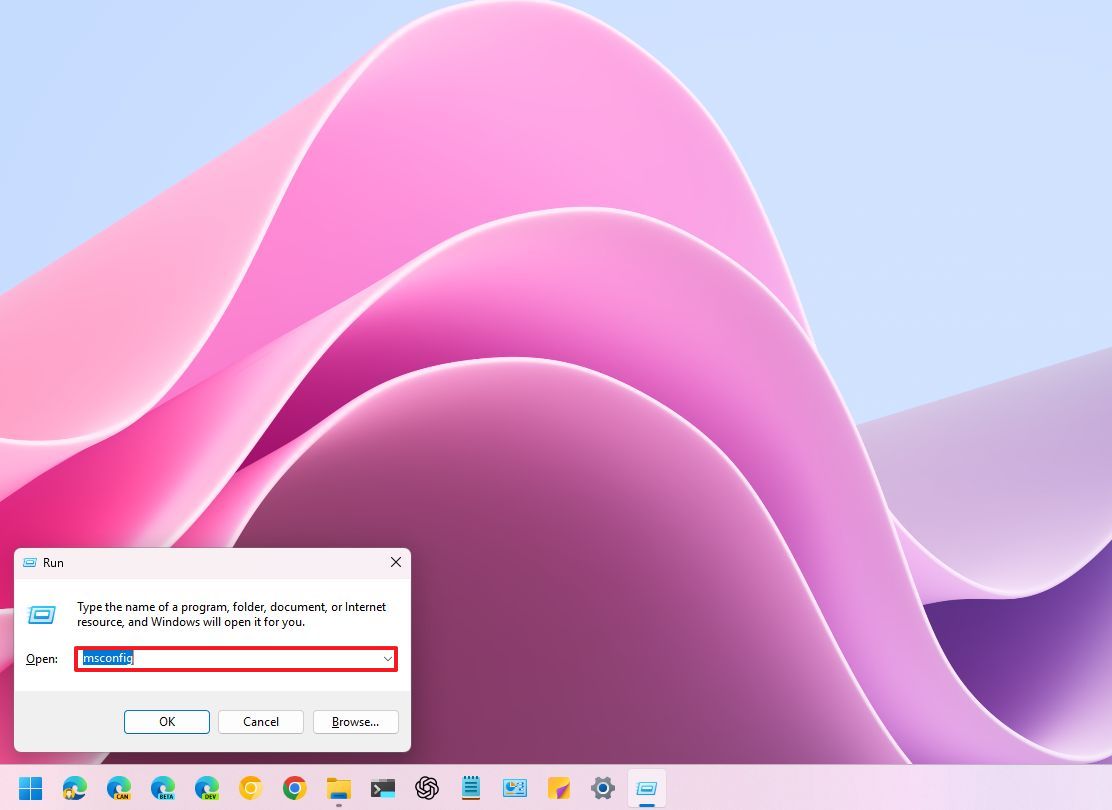
- Используйте «Windows + R» сочетание клавиш, чтобы открыть диалоговое окно «Запустить».
- Введите msconfig и нажмите enter (или нажмите кнопку ok ).
Из меню «Пуск»:
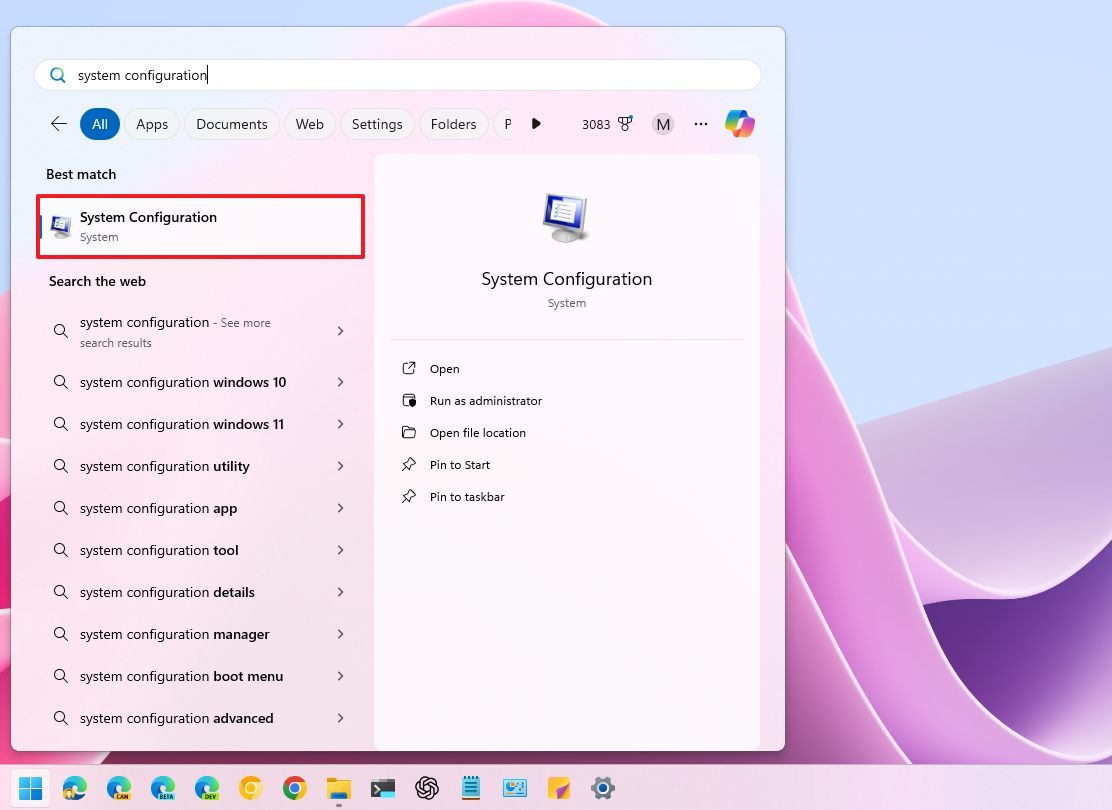
Чтобы открыть MSConfig из меню «Пуск», используйте эти шаги:
- Откройте start .
- (Вариант 1) Поиск msconfig и нажмите верхний результат, чтобы открыть приложение.
- (Вариант 2) Поиск Системной конфигурации и нажмите верхний результат, чтобы открыть приложение.
Как ориентироваться в msconfig в Windows 11
Когда вы откроете приложение для конфигурации системы, вы найдете несколько вкладок, каждая из которых с его уникальной целью.
Вкладка «Общие»
На вкладке «General» можно изменить поведение запуска.
- Нормальный запуск (по умолчанию): Это режим по умолчанию, в котором загружаются все программы и услуги запуска.
- Диагностический запуск: Этот режим запускает операционную систему только с основными услугами и драйверами, помогая выявлять конфликты или проблемы.
- выборочный запуск: это позволяет выбирать, какие программы и сервисы загружать при запуске. Вы можете отключить несущественные элементы, чтобы ускорить время загрузки и разрешить конфликты.

Стоит отметить, что опция «Выборочный запуск» имеет три настройки, как описано ниже.
Загрузка системных служб:
- Проверено: Этот параметр загружает все основные системные службы, необходимые для корректной работы операционной системы.
- Снято: Отключает большинство встроенных служб. Хотя этот параметр может значительно ускорить запуск, он может привести к нестабильности или помешать правильной работе некоторых программ. Снимите этот флажок, только если вы знаете, что делаете.
Загрузить элементы запуска:
- Проверено: Этот параметр загружает программы, настроенные на автоматический запуск при входе в систему. Сюда входят установленные вами приложения, а также некоторые системные утилиты.
- Флажок снят: Предотвращает запуск всех программ автозагрузки. Это может ускорить загрузку, но означает, что вам придется вручную запускать все необходимые приложения.
Параметр «Исходная конфигурация загрузки» указывает операционной системе игнорировать любые изменения, внесенные в параметры запуска в рамках конфигурации системы, и вместо этого использовать первоначальные параметры загрузки, которые были установлены на момент установки системы.
Выбор этого параметра сделает «Выборочный запуск» недоступным, и вместо него для вас автоматически будет выбран вариант «Обычный запуск».
Загрузочная вкладка
Раздел «Загрузка» позволяет управлять различными параметрами загрузки, включая активацию безопасной загрузки, включение ведения журнала загрузки и определение системы по умолчанию в конфигурациях с несколькими системами.
В верхней части экрана вы можете увидеть список операционных систем, установленных на вашем компьютере. Как правило, на вашем компьютере установлена только одна операционная система, но если на вашем компьютере установлена система с двойной загрузкой, в этой области также будут отображены дополнительные настройки.
Если на вашем компьютере установлено несколько версий Windows, вы также можете выбрать одну конкретную установку и нажать кнопку «Установить по умолчанию». Эта версия будет автоматически запущена по истечении указанного периода ожидания.
Как фанат, я бы сказал: Если, по какой-то случайности, изменения, которые вы внесли в свою загрузочную систему (например, отказ от двойной загрузки), не вступили в силу в меню загрузки, вы всегда можете выбрать и удалить эту конкретную запись для надлежащего рассмотрения.
Безопасный запуск: С помощью этой функции вы можете перевести компьютер в режим диагностики (также известный как Безопасный режим), при котором активируются только необходимые драйверы и службы. Этот режим полезен при попытке устранить неполадки в системе. Для этой цели вы можете выбрать один из различных вариантов.
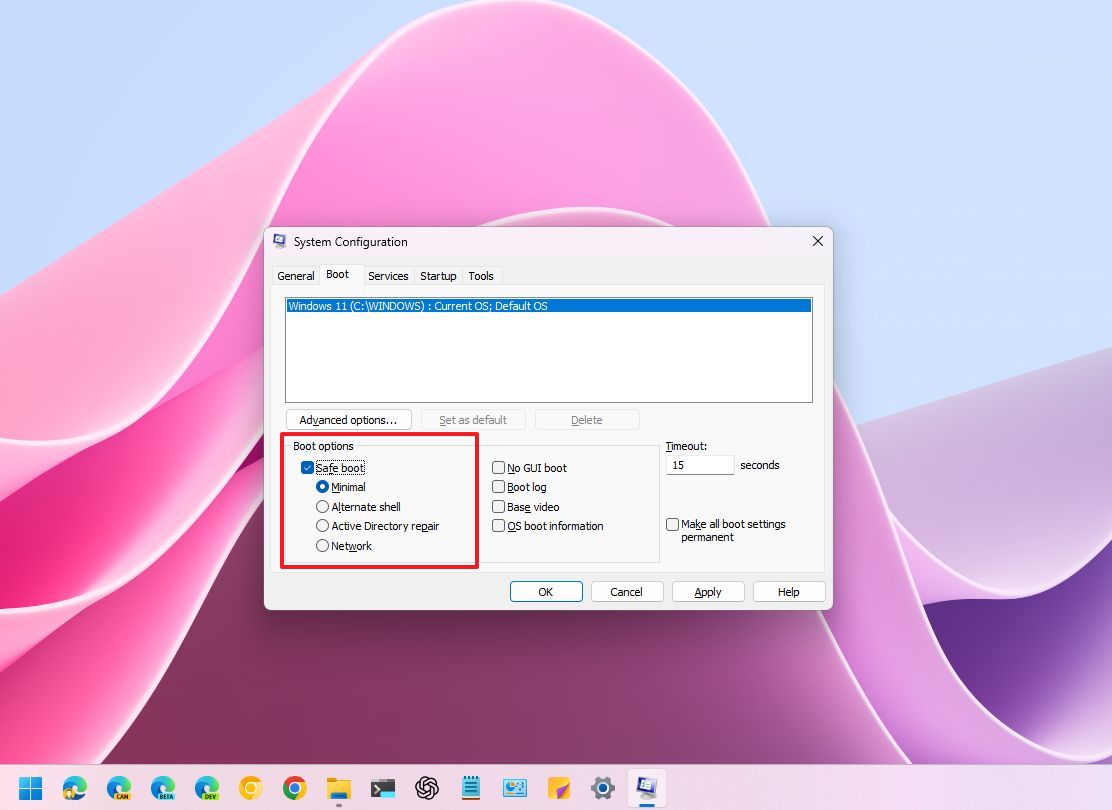
- Минимальные возможности: Работа в безопасном режиме со стандартным графическим интерфейсом пользователя.
- Альтернативная оболочка: Безопасный режим с командной строкой вместо графического интерфейса.
- Восстановление Active Directory: Безопасный режим со службами Active Directory для устранения проблем с сетевым подключением к Active Directory.
- Сеть: Безопасный режим с поддержкой сети и графическим интерфейсом.
В качестве опции загрузки вы также можете выбрать:
- No GUI boot: Disables the startup splash screen during startup, showing a black screen instead.
- Boot log: Creates a log file (Ntbtlog.txt) that records the startup process, which can help identify driver issues. The file will be available inside the «Windows» folder on the «C:» drive.
- Base video: Forces the system to use the basic video driver, which is helpful if you have display problems.
- OS boot information: Displays driver loading details on the screen during startup, which is useful for debugging.
The «Timeout» setting dictates the duration that the boot menu stays visible when using a dual-boot setup. You’re able to modify this duration by seconds, causing your default OS to launch automatically after the specified elapsed time during system startup.
Lastly, you might want to consider selecting the «Persist Boot Settings» option. Once chosen, your boot settings will remain unchanged.
If you choose not to select this option, it will be simple for you to navigate among various startup modes such as Normal, Diagnostic, and Selective, which are all located within the General tab.
If you select that option, you won’t be able to effortlessly revert to the «Regular Startup» setting in the future. Regardless of your desire to pick the «Regular Startup» option once more, the system will not acknowledge your choice because it essentially no longer remembers this option is available.
In each mode, the preferences are permanently stored. However, the key factor lies in how convenient it is for you to switch to a different mode.
On the «‘Advanced Settings’» page, you can adjust certain intricate settings related to the system startup process, primarily meant for specialized problem-solving or testing situations.
Keep in mind that changing these settings could impact your computer’s boot-up procedure, potentially leading to stability problems.

Number of processors
This option lets you limit the number of processor cores that the system uses during startup.
In simpler terms, while Windows 11 acknowledges all the cores within your processor, it will only activate the number of cores you initially chose during the startup process.
It’s mainly intended for troubleshooting and experimentation purposes; therefore, it’s best to keep it turned off so that the operating system can utilize all its accessible processors.
Maximum memory
This option restricts the amount of memory that the operating system uses during startup.
Much like the processor setting, this one is primarily used for testing or mimicking low memory scenarios. If you don’t need to restrict memory during system startup for a particular purpose, it’s recommended that you keep this option untouched.
PCI lock
Choosing this option ensures that the PCI bus’s I/O and IRQ resources for input/output and interrupt requests won’t be reassigned by the operating system during the start-up process.
In most situations, this highly specialized setup isn’t required. It’s primarily useful when dealing with hardware clashes or compatibility problems between older equipment parts.
Debug
Activating this feature enables kernel-mode debugging, a tool primarily utilized by developers for diagnosing and resolving problems related to device drivers.
It’s not something you’d typically need for regular use.
Services tab
The «Services» tab offers a user-friendly control panel for managing different backstage services that are active within the operating system.
List of services
Here, you can find a comprehensive rundown of the services running on your system. Each entry provides information such as the service’s name, its manufacturer details, its present status (whether it’s active or paused), and whether it automatically starts up upon system boot.
In this area, you’ll find a checkbox for every service. When it’s ticked, the service gets activated and initiates on its own when the system reboots. Conversely, if the box remains unticked, the service remains deactivated and won’t start up automatically during boot.
The «Conceal All Essential Microsoft Services» setting conceals all necessary services required for the proper functioning of the operating system.
This choice is advantageous since it lets you concentrate on external services (services installed from apps you’ve added), which can typically be safely disabled when you’re aiming to optimize startup or diagnose issues on your computer.
Furthermore, this tab offers switches for activating or deactivating all services, a feature that can be useful when diagnosing various issues.
For instance, if you need to carry out a clean boot for troubleshooting software issues, you should select the « ‘Hide all Microsoft services’» option and press the « ‘Disable all’«. Additionally, from the Task Manager’s « Startup » tab, it would be wise to disable every application that has been set up to launch at startup.
The ‘Services’ feature offers a means to control back-end operations, though it’s important to handle it with care. It’s always wise to investigate unknown services prior to disabling any, as many of them are crucial for Windows 11 to function properly.
As a tech enthusiast, I can tell you that diving into the «Services» section offers me a user-friendly platform to oversee and control the diverse set of background operations that keep my operating system humming smoothly behind the scenes.
List of services
Here you’ll find a comprehensive rundown of the services running on your computer. The list includes the service’s title, details from the manufacturer, its status (whether it’s currently active or paused), and whether it starts up automatically upon system boot.
Here, you’ll find a checkbox for every service. When checked, that service gets activated and runs on its own when your system boots up. Conversely, if left unchecked, the service remains inactive and won’t start by itself during the boot process.
The «Conceal all Microsoft System Services» option masks all the crucial services necessary for the proper functioning of the operating system.
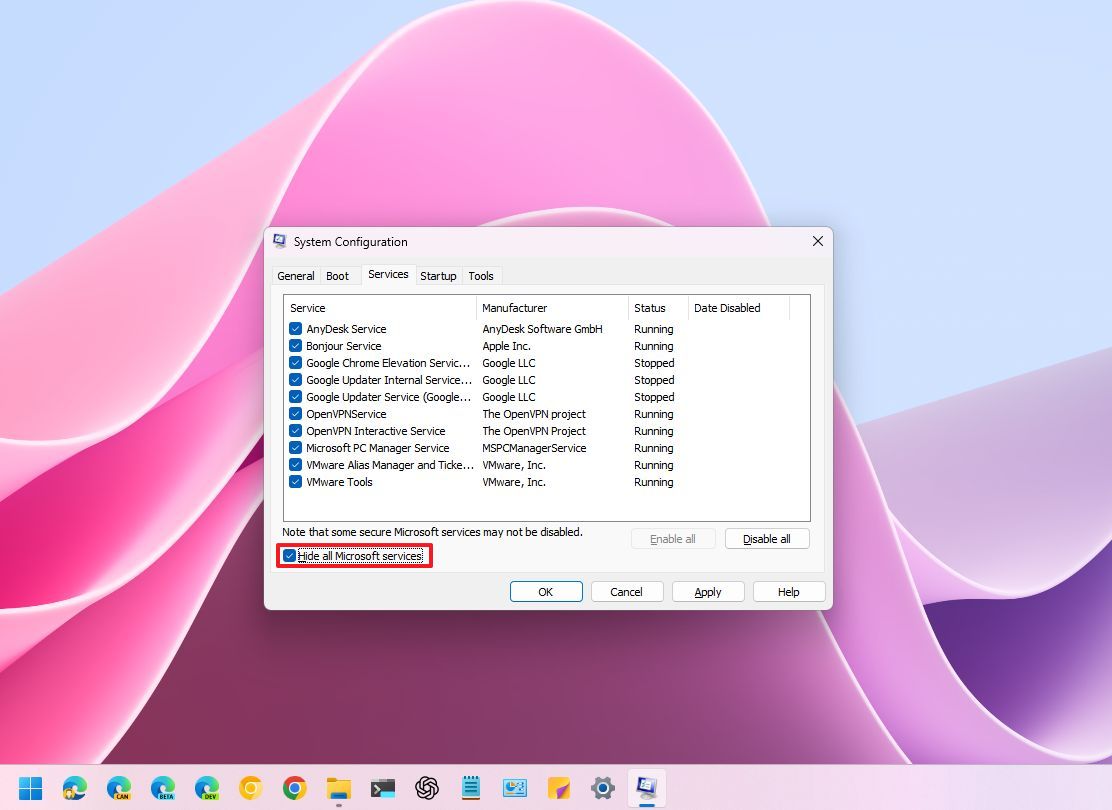
As an analyst, I find it beneficial to concentrate on third-party services, primarily those associated with applications I’ve explicitly installed, as they tend to be safer to deactivate when aiming to optimize the startup process or diagnose issues on my computer.
Furthermore, this tab features buttons that allow you to activate or deactivate all services, a useful tool for diagnosing various issues as well.
To effectively troubleshoot software issues, you can choose the «Hide all Microsoft services» option and hit the «Disable all» button for a clean boot. Additionally, from the Startup tab in Task Manager, it’s advisable to deactivate all applications that are set to launch during system startup.
The ‘Services’ feature offers the ability to control backstage operations, however, be mindful when utilizing it. It’s advisable to investigate any unknown services prior to disabling them, as many are vital for Windows 11 to function smoothly and efficiently.
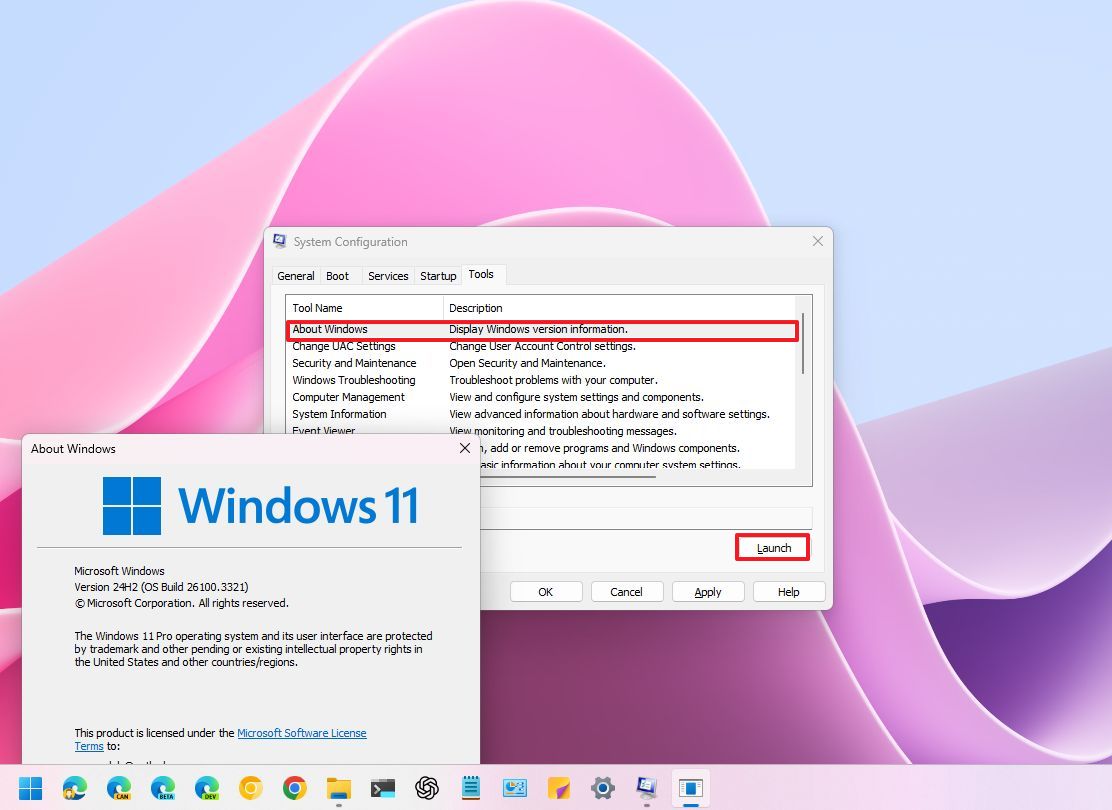
Tools tab
The «Tools» tab provides easy access to diverse system utilities and diagnostic tools. Effectively, it serves as a handy shortcut to run these applications, sparing you from having to browse through the Start menu or search for them within the System Configuration application.
From this tab, you can launch:
- About Windows.
- Change UAC Settings.
- Security and Maintenance.
- Windows Troubleshooting.
- Computer Management.
- System Information.
- Event Viewer.
- Programs.
- System Properties.
- Internet Options.
- Internet Protocol Configuration.
- Performance Monitor.
- Resource Monitor.
- Task Manager.
- Command Prompt.
- Registry Editor.
- Remove Assistance.
- System Restore.
The «Tools» tab is mainly for quick access to pre-existing system tools, however, it’s seldom utilized as these tools can also be reached through the Start menu, the Settings app, or directly via Windows Tools.
The System Configuration additionally encompasses what was previously known as the «Startup» tab, however, the settings are now found within the Task Manager.
More resources
Смотрите также
- Как сбросить приложение безопасности Windows, чтобы устранить проблемы в Windows 11 и 10
- vivo iQOO Z10x ОБЗОР: яркий экран, удобный сенсор отпечатков, объёмный накопитель
- Шоппинг в Гонконге. Где купить iPhone и iPad.
- Что такое Bazzite и лучше ли она, чем Windows для PC-гейминга? Я установил этот набирающий популярность дистрибутив Linux, чтобы проверить это самостоятельно.
- Простые советы, чтобы немедленно улучшить ваши фотографии.
- Нефть вниз, инфляция под контролем: что ждет российский рынок в апреле? (14.03.2026 04:32)
- Nothing Phone (4a) Pro ОБЗОР: большой аккумулятор, скоростная зарядка, замедленная съёмка видео
- Motorola Moto G67 Power ОБЗОР: яркий экран, плавный интерфейс, удобный сенсор отпечатков
- Виртуальные прогулки учат роботов ориентироваться
- Что такое стабилизатор и для чего он нужен?
2025-02-20 16:11